SSRS: Unable to load client print control for non admin user
The issue may occur if the current RSClientPrint is not upgraded successfully during the installation of SQL Server 2012 SP1. Here, I suggest that you try the following the steps:
1. Navigate to the <Drive>:\Program Files\Microsoft SQL Server\MSRS11.<Instance Name>\Reporting Services\ReportServer\bin directory on the report server machine and copy the proper version of the “rsclientprint.cab” file (i.e. x64 version or x86 version).
2. Extract the rsclientprint.cab file and copy all the files to the C:\Windows\Downloaded Program Files folder.
3. Run the command prompt as administrator, and register the rsclientprint.dll by using the following commands:
cd C:\Windows\Downloaded Program Files
regsvr32 rsclientprint.dll
regsvr32 rsclientprint.dll
We would now see a pop up stating the dll is registered successfully.
Put the rsclientprint.dll and the listed .rll files in a network folder, such as \\server\share\RSClientPri
Locate the Report Server\bin folder.
• If you run Microsoft SQL Server 2000 Reporting Services, the folder is located in the following location:
C:\Program Files\Microsoft SQL Server\MSSQL\Reporting Services\ReportServer\bin
• If you run Microsoft SQL Server 2005 Reporting Services, the folder is located in the following location:
C:\Program Files\Microsoft SQL Server\MSSQL.4\Reporting Services\ReportServer\bin
• If you run Microsoft SQL Server 2005 Reporting Services, the folder is located in the following location:
C:\Program Files\Microsoft SQL Server\MSSQL.4\Reporting Services\ReportServer\bin
b. Right-click the RSClientPrint.cab file, and then click Extract. Extract the file to the folder in step 12a.
c. Right-click the RSClientPrint.inf file that you extracted in step 12b, and then click Install.
d. Try to print the report.
Reporting Services Client-Side Printing and Silent Deployment of RSClientPrint.cab ActiveX file.
RSClientPrint.cab is a Microsoft ActiveX control that provides client side printing for Microsoft SQL Server Reporting Services reports.
The ActiveX control displays a custom print dialog box that supports common features with other print dialog boxes. The client-side print dialog box includes a printer list for selection, print preview option, page margin settings, orientation, etc.
The ActiveX control displays a custom print dialog box that supports common features with other print dialog boxes. The client-side print dialog box includes a printer list for selection, print preview option, page margin settings, orientation, etc.
Downloading and installing the ActiveX control RSClientPrint.cab requires administrator permissionson the client machine.
If a user runs a SQL Server Reporting Services report and if the toolbar is displayed, the user can click on the print buttons seen on the right side of the toolbar.
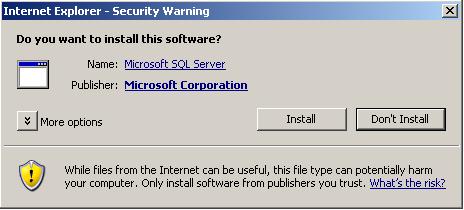
If the print command is being run for the report server by that user's client machine then the client request the RSClientPrint.cab download from the related Report Server. While downloading the ActiveX software the browser will promt the user whether the software will be installed or not considering the security issues. Again, it is necessary to note that administration permissions are required for downloading and installing the rsclientprint ActiveX. For RSClientPrint install, RSClientPrint.cab download is the first step in installing the ActiveX on IE browser.
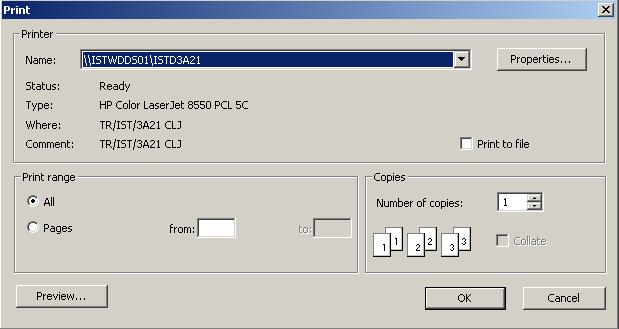
After the installation of the RSClientPrint is successfully done, the Print dialog box is displayed as shown below. You will realize that the Print options is very similar to standart Print dialog boxes that run on Windows systems including preview, number of copies, print range, printer selecting from available printers, etc.
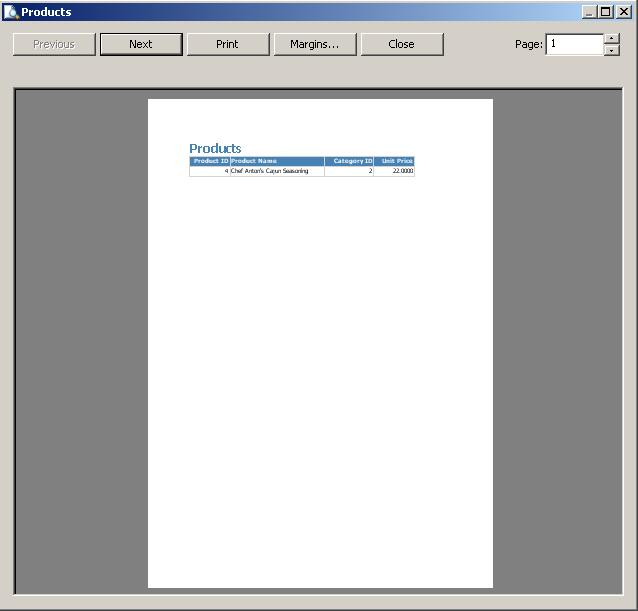
Print Preview option for the Reporting Services report.
rsclientprint.cab and rsclientprint install
In most companies the Information Technology policies do not grant the admin privileges to the end users. So the end users running on the client computers can not download and install the ActiveX print client file RSClientPrint.cab.
So it is a need for the IT departments to distribute this client side printing ActiveX control in order to support their clients to work with SQL Server Reporting Services (SSRS) without a problem.
You can find the file rsclientprint.cab on the Report Server bin folder. The Reporting Services Report Server folder can be on
C:\Program Files\Microsoft SQL Server\MSSQL\Reporting Services\ReportServer\bin folder for SQL Server 2000 Reporting Services and
C:\Program Files\Microsoft SQL Server\MSSQL.4\Reporting Services\ReportServer\bin folder for SQL Server 2005 Reporting Services.
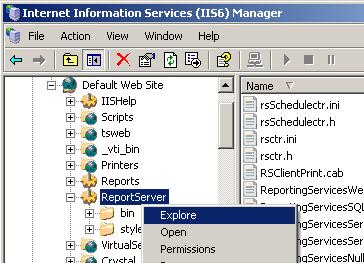
Actually for SQL Server 2005, the installation folder may vary due to the installed components of the SQL Server 2005. You can also find the ReportServer bin folder by openning the IIS Manager and then exploring the ReportServer (if installed with default settings) virtual directory.
If you extract the contents of the RSClientPrint.cab file you will see that the .cab file consists of the following files.
gdiplus.dll
RSClientPrint.dll
RSClientPrint.inf
RSClientPrint_1028.rll
RSClientPrint_1031.rll
RSClientPrint_1033.rll
RSClientPrint_1036.rll
RSClientPrint_1040.rll
RSClientPrint_1041.rll
RSClientPrint_1042.rll
RSClientPrint_1043.rll
RSClientPrint_1046.rll
RSClientPrint_1053.rll
RSClientPrint_2052.rll
RSClientPrint_3082.rll
For a silent deployment of RSClientPrint.cab, you only need to distribute RSClientPrint.dll file and the .rll files.
If you copy the files listed below under the folder C:\WINNT\system32 for client computers.
RSClientPrint.dll
RSClientPrint_1028.rll
RSClientPrint_1031.rll
RSClientPrint_1033.rll
RSClientPrint_1036.rll
RSClientPrint_1040.rll
RSClientPrint_1041.rll
RSClientPrint_1042.rll
RSClientPrint_1043.rll
RSClientPrint_1046.rll
RSClientPrint_1053.rll
RSClientPrint_2052.rll
RSClientPrint_3082.rll
RSClientPrint_1028.rll
RSClientPrint_1031.rll
RSClientPrint_1033.rll
RSClientPrint_1036.rll
RSClientPrint_1040.rll
RSClientPrint_1041.rll
RSClientPrint_1042.rll
RSClientPrint_1043.rll
RSClientPrint_1046.rll
RSClientPrint_1053.rll
RSClientPrint_2052.rll
RSClientPrint_3082.rll
Register the RSClientPrint.dll dll file by running the regsvr32.exe command on the command prompt shown as below.
c:\regsvr32.exe /s
c:\winnt\system32 \rsclientprint.dll
c:\winnt\system32 \rsclientprint.dll
So, if a script or an MSI file that copies the listed files above and registers the rsclientprint.dll will be enough to deploy the Reporting Services Client Side Printing functionality.
SQL Server 2008 Reporting Services on Windows 7 RSClientPrint.cab ActiveX file
Windows 7 has been released and SQL administrators and BI developers can start working on SQL Server 2008 on Windows 7 with its one of Business Intelligence (BI) components Reporting Services.
What is changed for SQL2008 SSRS is that the default bin folder of the ReportServer 2008 where new RSClientPrint-x86.cab, RSClientPrint-x64.cab or RSClientPrint-ia64.cab ActiveX file download can be found at :
C:\Program Files\Microsoft SQL Server\MSRS10.MSSQLSERVER\Reporting Services\ReportServer\bin
If you are working on Windows 7 with MS SQL Server 2008, you can review the contents of the new RSClientPrint.cab file downloads.
To create a new File preference item using GPO:
- Open the Group Policy Management Console. Right-click the Group Policy object (GPO) that should contain the new preference item, and then click Edit.
- In the console tree under Computer Configuration or User Configuration, expand the Preferences folder, and then expand the Windows Settings folder.
- Right-click the Files node, point to New, and select File.
- In the New File Properties dialog box, select an Action for Group Policy to perform. (For more information, see "Actions" in this topic.)
- Enter file settings for Group Policy to configure or remove. (For more information, see "File settings" in this topic.)
- Click the Common tab, configure any options, and then type your comments in the Description box. (For more information, see Configure Common Options.)
- Click OK. The new preference item appears in the details pane.
Actions
This type of preference item provides a choice of four actions: Create, Replace, Update, and Delete. The behavior of the preference item varies with the action selected and whether the file already exists.
Create
|
Copy a file (or multiple files in one folder) from a source location to a destination location if it does not already exist at the destination, and then configure the attributes of those files for computers or users.
|
Delete
|
Remove a file (or multiple files in one folder) for computers or users.
|
Replace
|
Delete a file (or multiple files in one folder), replace it with another file or files, and configure the attributes of those files for computers or users. The net result of the Replace action is to overwrite the files at the destination location. If the file does not exist at the destination, then the Replace action copies the file from the source location to the destination.
|
Update
|
Modify settings of an existing file (or multiple files in one folder) for computers or users. This action differs from Replace in that it only updates file attributes defined within the preference item. All other file attributes remain as configured on the file. If the file does not exist, then the Update action copies the file from the source location to the destination.
|
File settings
Source file(s)
|
Type the location from which to copy the Source file(s). This location can be a fully qualified UNC path or a path on a local or mapped drive from the perspective of the client. This field can contain variables.
This field can also contain single character (?) and multiple character (*) wildcards, allowing you to copy or modify multiple files.
This option is available only if the action selected is Create, Replace, or Update.
|
Destination file
|
Type the location to which to copy a file or the location of the file to be modified. This location can be a fully qualified UNC path or a path on a local or mapped drive from the perspective of the client. Parent folders are created as necessary. You must include the file name, and you can change the file name by providing a different name for it than specified in the Source file(s) field.
This option is available only if the action selected is Create, Replace, or Update and the Source files(s) does not include wildcards.
|
Destination folder
|
Type the location of the folder to which to copy files or the location of the files to be modified. This location can be a fully qualified UNC path or a path on a local or mapped drive from the perspective of the client. Parent folders are created as necessary.
This option is available only if the action selected is Create, Replace, or Update and the Source files(s) includes wildcards.
|
Delete file(s)
|
To delete a file, type the path for the file from the perspective of the client.
To delete multiple files within a folder, incorporate single character (?) and multiple character (*) wildcards in the file name.
This option is available only if the action selected is Delete.
|
Suppress errors on individual file actions
|
To allow multiple files to transfer even if one or more individual files fail to transfer, select this check box. Only errors due to an attempt to replace, delete, or configure attributes of a file are suppressed. Such errors may be due to the file being in use, access being denied, or the source file not being found. With this option selected, such errors can only be detected in the trace file. This option is distinct from the default preference error suppression that can be overridden on the Common tab.
|
Attributes
|
To configure file system attributes for the files being transferred, select the appropriate check boxes in the Attributes box. Unchecked attributes are removed from the file at the destination.
|
Additional considerations
- Many incremental backup systems use the Archive attribute to determine whether a file or folder has been created or changed and to back up the file or folder. For this reason, Archive is selected by default to select the Archive attribute on any modified folder.
- If the Common tab option to Remove this item when it is no longer applied is selected, the destination file is deleted if it is a single file. In a multiple file operation, no files are deleted.
- By default, a file preference item has access to all objects with the SYSTEM Access Control Entry (ACE). To change this item to run with end-user permissions (if under User Configuration), change the security context on the Common tab.
- A file preference item resets the Read Only attribute of any destination file if necessary to accomplish the specified task.
- You can use item-level targeting to change the scope of preference items.
- Preference items are available only in domain-based GPOs.
posted by Masud Ahmed @ <$BlogItemDateTime
$>
1 Comments
![]()
